

Registering as a provider.
Go to opportunities.volunteeringkingston.org.uk and click register. You will then be asked to fill in your organisation’s details.
Once you have completed the registration page you will be logged in to your new account. You’ll be greeted by a short tutorial, which will be helpful for first time users.
Once you have logged in you can update your public profile by going to ‘Account’ and ‘Public Profile’ to provide volunteers with information about your organisation and include your organisation logo or photo.
Creating and managing an opportunity
To create an opportunity, click ‘Opportunities’ and ‘Create Opportunity.’ You can then fill out all the boxes with the information relevant to that role.
Click save once you are done and the role will come through to Volunteering Kingston for approval. Please read our guidance document in ‘Resources’ on creating a suitable role description this can be found under the ‘Help and Resources’ tab.
To manage an opportunity, use the options on the left-hand side menu on your opportunity page, here you will be able to make changes to the opportunity, see who has applied and approve of decline volunteers, copy and convert the opportunity and delete the opportunity. If you want to keep the information on the system, such as volunteer hours, we would suggest closing the opportunity rather than deleting it.
What is the difference between APPLICANTS and VOLUNTEERS?
If an opportunity is set to APPLYING then volunteers must apply and be approved by the provider before they are on the opportunity.
When a volunteer applies for an opportunity, the provider assesses them and if they are approved then they will be moved from the applicants list to the volunteers list. Volunteers can then be assigned to a session on the opportunity.
A volunteer has applied to one of your opportunities, what to do now.
These volunteers have applied to volunteer with your organisation, it is now up to you to contact them to progress their application, this may be inviting them to have a quick phone conversation about the role, or asking them to complete an application form.
You can see who has applied by logging into your account, go to the opportunity, on the left-hand side click ‘Volunteers‘ you will then see a list of all the volunteers who have applied for that opportunity.
If you requested information on their skills and experience hopefully they will have included a short message, but no worries if not. You can view their profile and decide if you want to progress their application. Either way, it’s best practice to let volunteers know the status of their application and why you won’t be taking the application further.
Simply click on the name of the volunteer, click on the three dots on the right-hand side of the page and click on the envelope to write them a message. It is strongly advised you include in here your own organisation contact details.
Creating events
Events are a way of grouping together opportunities and promoting them all as one event.
You can add an event by going to ‘Opportunities’ and ‘Events’ click ‘Add’ to add your event by entering the name of the event, you can then click add and add as much information as you wish about the event including uploading an image. To add opportunities for this event, go to ‘Opportunities’ and ‘Create opportunity’ when asked if the opportunity is part of an event select yes and select the event. You can also add existing opportunities by going to your opportunities and clicking ‘manage’ go to the opportunities ‘Details’ tab on the left and under ‘Opportunity part of an Event’ select yes.
You can ‘Close’ or ‘Open’ an event at any time, allowing you to alternate whether or not volunteers can see the event.
If an event does not have any ‘Open’ opportunities attached to it, then the event will automatically be marked as ‘Closed’. So only events with at least one open opportunity attached to it will be visible in the search results.
Inviting volunteers to apply
If you know a volunteer who is interested in the role, whether they are registered with Volunteering Kingston or not, you can invite them to apply. Go to ‘Manage Volunteers’ and select ‘Invite Volunteers’ you can then type their email in manually separated by ‘,’ or upload a list of email addresses on a CSV file. Just make sure all the emails are on separate lines. They will receive an email asking them to apply; you can re-invite them again in future.
Creating a volunteer group
This is a group of volunteers that can be used for multiple purposes for example: To restrict opportunities only to those volunteers, or communicate ONLY with that group of volunteers etc.
Volunteer groups can be used for multiple purposes including:
- Limiting an opportunity to only volunteers within a specific group/s
- Sending emails to a specific group
- Keeping track of which stages of the enrolment process volunteers have completed.
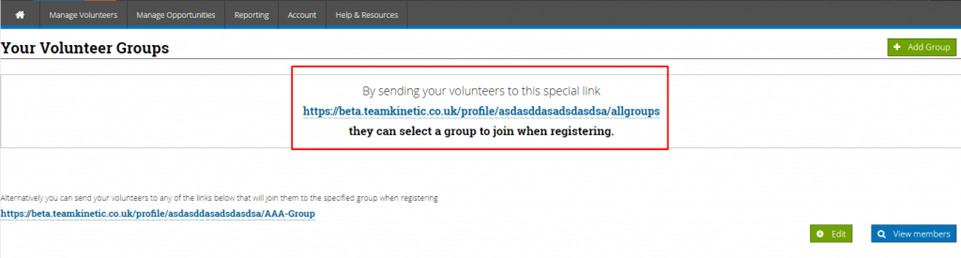
You can send volunteers specific invite URL links, which will allow the volunteer to register on the system and put them in a specific group.
You can either send them to the ‘Choose Group’ link (shown below), which allows the volunteer to register as normal but also asks them to choose a group to be linked to. By sending this link you will be allowing the volunteer to choose from a list of all your volunteer groups.
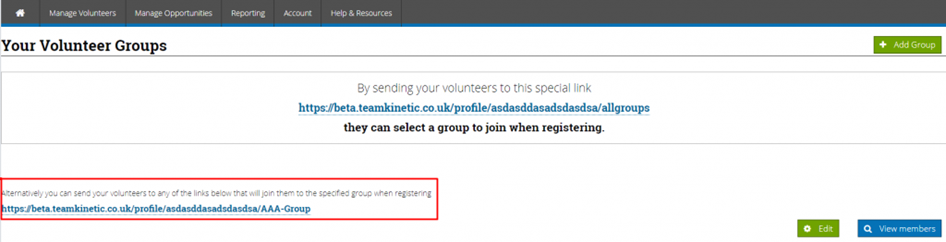
Or you can send them a ‘Specific Group’ link (shown below), which allows let them register in the normal way but also put them in the relevant group (in the screen shot below the volunteer will be automatically put into a group called AAA-Group). Using this option the volunteer will not see a list of your groups and will be unaware that they have been automatically attached to the group.
Using either of these methods will of course mean the volunteer is part of the providers cohort, so the provider can view volunteers’ details and manually attach them to their opportunities.
Logging hours as a provider
Manage opportunities, opportunities, log hours, give feedback to each individual volunteer and click save, then you can log the hours that they have completed. The volunteer may also do this themselves so you can you can also give bulk feedback by clicking bulk feedback and log hours
For those providers who do not need to manually check what hours the volunteers have done, you can use the ‘Log All Hours’ function.
SESSIONAL OPPORTUNITIES: This will check the length of the sessions and log the maximum hours permitted. It will include any sessional opportunity that has sessions in the past that the provider has not yet logged.
FLEXIBLE OPPORTUNITIES: It will list volunteers who have logged more hours than the provider. By logging the provider hours this way, it will match what the volunteer has logged.
What is the difference between a FLEXIBLE and SESSION BASED opportunity?
Session based opportunities have specific times and duration, where flexible opportunities only have a start and end date.
For example;
A Football coach opportunity takes place every Tuesday at 7pm for every week of the year, so there are 52 sessions. Volunteers on ‘Session Based’ opportunities can just click ‘Log Hours’ and the system will automatically log their hours for the length of the session.
A Chair of the football club volunteers different hours each week depending on their availability, so this is a flexible opportunity. Volunteers on flexible opportunities have to enter the ‘Date’ and ‘Hours’ when logging their hours.